Guide: How to Install Electric Fence for Horses
Installation Instructions for Cameo™ Electric Line Fence
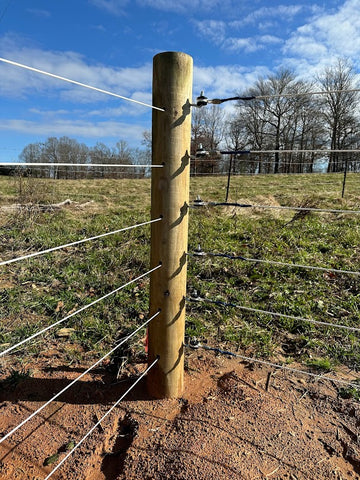
INITIAL SET UP: Using Cameo Pulse™, Cameo™ Fencing’s Electrified Line, install posts, corner collars, insulators, and string the Cameo Pulse™ on each line. The top line and second line up from the bottom should be the electrified lines. This keeps the horse honest while also allowing him to graze along the bottom of the fence line.
End & Corner Posts - pressure treated wood, round 5"- 6" in diameter and 8 ft. long.
- a 60 lb. bag of ready mix cement is recommended for each post hole
- this is all that is needed when using Cameo™ or Cameo Pulse ™
Line Posts - Your choice of post: round 4"- 6" in diameter and 8 ft. long (pressure treated) wood, vinyl, or metal t-posts.
- pull a line of heavy string between end posts or end post and corner post no more than 2 feet off the ground. Do one straight line at a time. Use this line as a guide to set your posts.
- space posts 12ft. apart
- cement not required.
Mark your posts for Line Post Insulators. Attach insulators with no more than 8" between lines.
- Wood posts -Line Post Insulators should be spaced no more than 6" apart. However, the bottom line can be up to/at most 10" above ground. Make a length of wood and mark for number and spacing of lines, use this as your guide for marking line posts.
- T-Posts: are already notched. Measure spacing to ensure no more than 6" between each Cameo or Cameo Pulse line. Then install insulators.
For a quick visual of all items and set-up, check out our “Fun Brochure” on cameofencing.com under “More”.
If you have questions – please call 800-822-5426
Prior to electric fence installation (Maxi-Grunt), gather the following materials:
- MaxiGrunt, Cameo™ Fencing’s Electrified Line (measure your linear footage x number of lines)
- End/Gate Post Insulator (1 per line per gate/end post)
- Corner Collars (1 per line x number of corners)
- Line Post Insulators (# of posts x the number of lines)
- Electric Line Connectors (2 connectors per line)
- U-Clamp (1 per line)
- Grounds Rod T-Handle, 3
- Ground Rod Clamps, 3
- Solar OR AC power adapter
- Underground Wire (measure distance from top line to stand with power adapter)
- Gate Handle (if necessary)
DO NOT TURN ON POWER OR CONNECT TO POWER UNTIL THE FENCE IS COMPLETE.
***READ THROUGH ALL INSTRUCTIONS PRIOR TO BEGINNING SET UP, NOTE THE BOLD TEXT
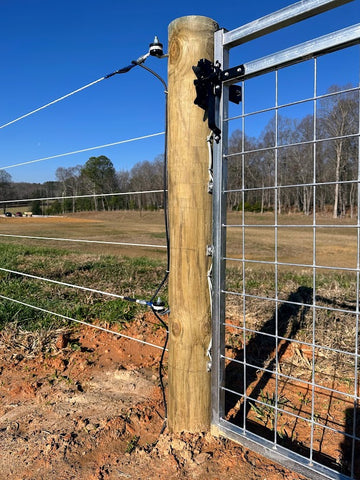
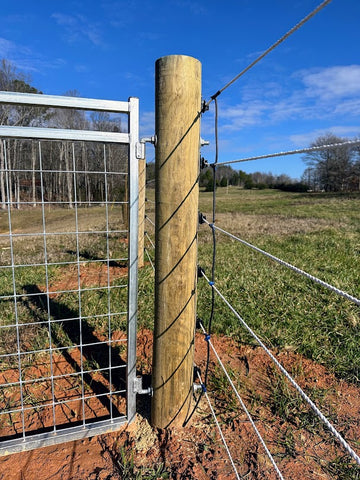
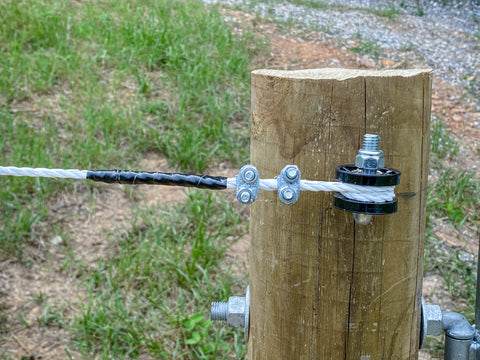
- First post, closest to Energizer: Set up your connections to the End/Gate Post Insulator, wrap Maxi-Grunt around the insulator wheel and bring it back to itself. Connect the “two” lines using 2 electric line connectors. You will repeat this for each end/gate insulator and line of Maxi-Grunt. Cut off excess line. Use electrical tape to wrap the loose end of the Maxi Grunt to itself (see images).
- Connect lines with Underground Wire, cut a strip just slightly longer than the space between each maxi-grunt line. Strip back the coating on the underground wire (about 4-5 inches), wrap around the Maxi Grunt line three to four times. Around this connection, secure with TWO U-clamps. *On the line closest to the ground, keep the length long enough to reach your energizer (Cyclops AC or Solar).
- Continuing the current when you have a gate, follow step two and run the wire underground (along the gate) and up to the next gate post; run the line up to connect each line of Maxi Grunt (follow step 2). NOTE: you do NOT need to create a “circle” for the electrical current to work.
- Connect Underground wire to electric current. Use the End/Gate post closest to your energizer. From the line closest to the ground, run the underground wire to your energizer, allowing enough length to bury it underground. Strip back 4-5 inches of coated covering and wrap around the fence terminal on your Cyclops unit (this may differ slightly on other AC or solar units).
- Bury your Ground Rods. The end of each rod should be 6’ deep and each should be spaced 10’ apart.
- Connect Energizer to Ground Rods. Cut a piece of underground wire long enough to reach your first buried ground rods, strip back 4-5” of coating and wrap around the rod, secure with a Ground Rod Clamp, and continue running and connecting the underground wire through to the last rod.
- Assure all connections are tight and secure.
- Plug charger into a 110v outlet.
- Work with your horse to learn the boundaries your electric fencing has created.
For a quick visual of all items and set-up, check out our “Fun Brochure” on cameofencing.com under “More”.
If you have questions – please call 800-822-5426